
Even if you are not a mechanic, maybe you would like to pick up some tips that allow for the better care and maintenance of Yamaha outboards. At least a few of these tips might even impress your mechanic friends, and some might help you out of a jam. So, let’s dig in.
Tip 1 – Removing Tight or Damaged Screws
Removing tight or damaged screws can be a challenge. To improve the grip between the screwdriver and the screw, dip the screwdriver’s tip in the valve grinding compound.
The compound provides the extra grip needed to help keep the screwdriver from coming out of the slots and causing further damage.
Tip 2 – Maintain the Health of Your Yamaha Outboard’s Lower Unit
Lubricate Your Yamaha’s Lower Unit
The lower unit converts the power generated by your outboard’s engine to rotate the prop shaft, allows the propeller to rotate—moving your boat subsequently. Its internal mechanical workings put a lot of pressure on the lubricant inside. This hardworking mechanism needs some simple, regular maintenance to maintain healthy operation.

Because the gears inside your lower unit are constantly turning, lower unit lubricant is needed to form a micro-thin film between the metal parts to keep them from touching. Under the large loads these gears exert, proper lubrication requires extreme resistance to pressure, foaming, and molecular shear. And, since the lower unit operates underwater, its lubricant also must be capable of maintaining necessary lubricity if water should leak inside.
Automotive or gear lubricant designed for other applications can’t do all of this. We highly recommend using Yamalube Marine Gearcase Lube as it delivers the protection and lubrication required, even with water present.
Checking Yamaha Outboards Lower Unit
Visually inspect the exterior of your lower unit for any signs of damage every time before you go out. Especially if you fish, every fifty hours or so, remove the propeller and check for fishing line or other debris wrapped around the propeller shaft, which can cut into prop shaft seals and potentially allow water to enter the gearcase. Even if you don’t fish, this procedure is still a good idea as a lot of fishing line and other debris is present in many bodies of water.
If you find line wrapped around your propeller shaft, of course, remove it, then visually inspect the prop shaft seals for damage or leakage. Then check the color of your lower unit lubricant by cracking the “drain screw” on the bottom of the bullet and the vent screw on the side of the lower unit. Allow a small amount of gear lube to drain into a clean container. If the lubricant is milky in color, there is water in the lubricant, and you made need to replace the seals.
Bonus Tip: Don’t run your outboard right before checking the lower unit lubricant, as this will agitate the oil with whatever air is trapped inside. Resulting fine air bubbles might be confused with the milky appearance that occurs if there is water present.
Change Your Gear Lube
Yamaha recommends replacing your lower unit lubricant after the first 20 hours for a new outboard, then every 100 hours. Also, if it’s milky in color or smells or looks burnt when you’re checking it, it’s time for a change regardless of the hours on the engine. If your gear lube is in poor condition prematurely, there may be a problem that needs to be addressed.
Tip 3 – How to Start a Boat with a Bad Starter
So what can you do if you are stuck on the water or the ramp and your boat won’t start? This is not ideal, but there is a workaround until you either get better positioned to repair it or get to your mechanic.
Some people tap the starter with a small hammer while another person turns the key. However, this isn’t always wise, but sometimes it can get the starter to engage to allow you to start the engine. Just be careful to avoid causing more damage.
A second method is applying direct power to the solenoid. This bypasses the solenoid with positive voltage, which should engage the starter. You should hear the engine crank, and you will probably see a spark. This technique is also far from ideal—even though it does work. You can very easily short a portion of your system or create a lot of damage. However, sometimes desperate times call for desperate measures.
Tip 4 – Yamaha Outboards Water Pump Care & Impeller
Your outboard’s water pump is responsible for keeping your Yamaha engine cool. It’s a simple system, but its maintenance is critical for the performance and life of Yamaha outboards. Cooling water is drawn in through the intake grates on your lower unit, up to and through a rubber impeller keyed to the drive shaft on top of the lower unit, and pumped up into the powerhead of your outboard. The water circulates and eventually exits back down through the propeller to help keep it cool from the outboard’s exhaust. A telltale hole emits a small, visible stream of water after it has passed through the powerhead to help indicate that cooling water is flowing.
Bonus Tip: If water stops flowing from the telltale, or if the stream becomes weak, carefully check the outlet tubing for obstructions. Insects love to nest in this area, especially during extended storage. However, not all outboards emit waterflow from the telltale when the engine is idling, even when operating normally. However, once RPM increases, you should see it water flowing from the telltale. If you don’t, watch your temperature gauge.
Extended time without use can lead to the impeller becoming permanently deformed due to its off-center positioning inside the cup. This condition makes water flow much weaker. Additionally, periods of non-use can cause the rubber to become brittle, perhaps even breaking pieces off and sending them into the cooling system. Therefore, it’s best to replace your water pump impeller or the entire water pump assembly when servicing these items.
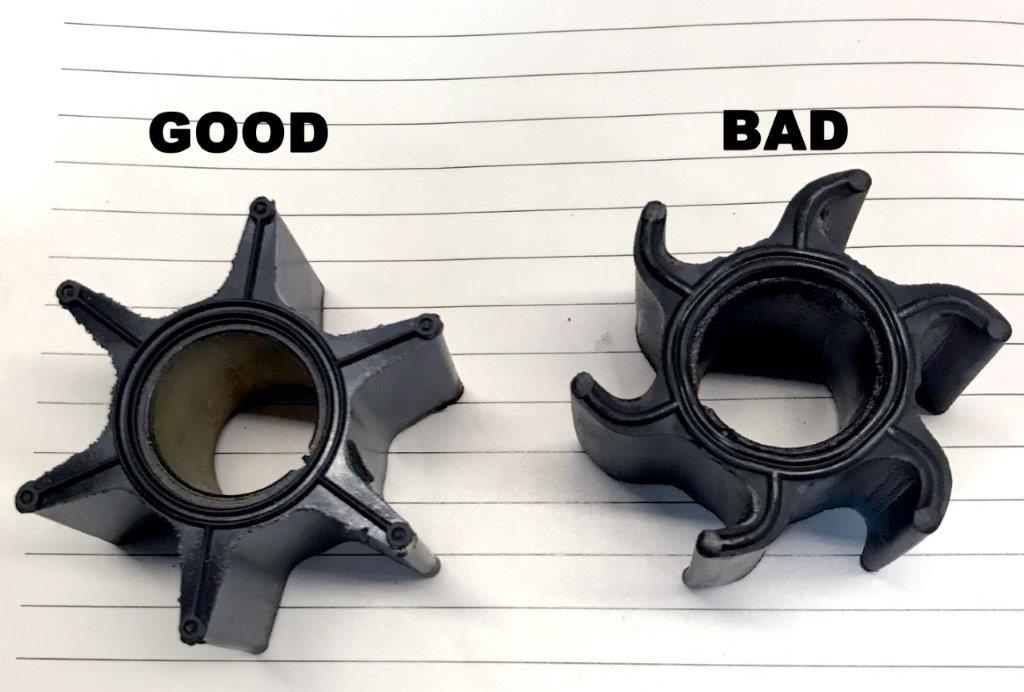
The rubber impeller is located inside a stainless steel cup and uses the water for lubrication. If this water is not present, the friction of the rubber on stainless steel will very rapidly overheat and destroy the rubber impeller. This is why it’s critical not to operate or even turn over your outboard without there being a proper supply of water to the outboard beforehand.
Inspect the impeller and water pump assembly every year if operating in salt, brackish or turbid water, and replace if necessary. The debris in these waters acts like sandpaper and tends to wear out these mechanisms more quickly. If operating in freshwater that is clear and clean, this interval may likely stretch to two seasons.
Tip 5 – When to Change Your Spark Plugs
For most boaters, pull four-stroke outboard spark plugs every two hundred hours or every other season and check for proper color and wear. They should be a light brownish color and have relatively sharp edges. When necessary, replace with the exact manufacturer and part number that your outboard’s manufacturer stipulates. The brand type and style of spark plugs used in your outboard are designed as they contain specific performance attributes that are engineered for your outboard’s operation.
Tip 6 – Air Intake Passages
Check your engine’s air intake passages for obstructions such as bird nests, insect nests, and other debris. Look under your cowling, too, as these can be another favorite nesting place for various critters.
Tip 7 – Your Power Trim and Tilt System
The Power Trim and Tilt (PT&T) unit on Yamaha outboards change the outboard’s thrust angle during operation for maximum performance of both your outboard and your boat. It’s electro-hydraulic, meaning an electric pump moves hydraulic fluid upon command from the operator, tilting the thrust angle out or in. It’s positioned inside the engine bracket, meaning almost constant contact with water, and, depending on where you boat, that can mean saltwater. Still, under normal conditions, this system needs only minimal care to function properly.
Cleaning
Make sure to include the PT&T unit in your routine post-trip flushing and wash down procedure. For best effect, first, run over it gently with a sponge or a soft cloth soaped up with mild detergent (boat soap that you use for washing your boat in general works great). Then, spray the whole unit down with fresh, clean water.
Lubrication
Periodically grease the top of the trim rams on your PT&T unit to help keep them safe from corrosion and eliminate those annoying but harmless squeaking and popping noises. Be sure to use high-quality marine-formula grease, like Yamalube Marine Grease that can stand up to water.
Protection
Keep the trim rams fully retracted when not in use to prevent corrosion build-up. Engage the tilt lock mechanism built into the outboard’s bracket, or install a Yamaha engine support to hold the engine in the tilt-up position. Then, withdraw the tilt rams into the unit by pressing the PT&T down button until they are fully retracted. This keeps all but the very tip of the ram immersed in a bath of PT&T fluid and safe from corrosion. Liberally apply Yamalube Marine Grease to the ram tips to help keep them corrosion-free, too.
Bonus Tip: The built-in tilt lock mechanism is for maintaining tilt for storage or periods of non-use only, such as when mooring. Do not trailer using only this mechanism to support the tilted outboard.

Fluids
The fluid in your PT&T system is under extreme pressure, and that can cause molecular shear, which tears apart the fluid’s molecules, resulting in a drastic loss of lubricity. Don’t use substitute oils like motor oil or power steering fluid. Yamaha Performance Power Trim & Tilt Fluid is specially formulated to tolerate a specific amount of water ingestion and maintain proper operation while withstanding extreme pressures. It also contains special anti-foaming agents the others don’t to maintain critical lubricity.
Valves and Seals
If you see fluid on the outside of the PT&T unit, or if your outboard won’t stay tilted up (or stay tilted out when running), it may mean that the seals or internal valves require inspection. Have the unit inspected by an authorized Yamaha Marine dealer and, if necessary, disassembled and repaired.
Tip 8 – Changing Fuel Filters on Yamaha Outboards
Fuel/Water Separating Filter
10-micron filters should be replaced every fifty hours of engine operation. Keeping this filter clean and fresh will help protect the other fuel filters on the engine and extend their service life. And always carry a spare on board, just in case you get a tank of bad gas, and the filter becomes overwhelmed.
Bonus Tip: Don’t simply remove and dump the fuel and re-install the filter, as captured debris and water could enter the “clean” side of the filter and be released into your fuel system.
Primary and in-line filters should be replaced after every 100 hours of engine operation. These are easy to get to and simple to replace.
VST filters should be inspected and/or replaced after every 300 hours of engine operation, provided that the 10-micron external and initial on-engine filters have been serviced and maintained properly. Properly treated fuel will also extend the life of these filters.
Tip 9 – Corrosion Prevention – Flush It and Fog Yamaha Outboards
Corrosion is an outboard’s number one enemy, and nothing contributes to corrosion more than a combination of saltwater and dissimilar metals. Replace all sacrificial anodes when they’re half gone; your manual will show you where they all are. Flush your outboard with fresh water every time you use it because heat and saltwater combine to leave stubborn deposits in cooling water passages. Don’t let saltwater simply dry as it will leave clogging deposits. You’ll want to flush your engine for about 15 minutes after every use. Even if you operate in freshwater, flushing is still a good idea to remove mud, algae, and other debris.
In addition to fresh water, adding a salt-removal solution like Salt-Away is a good idea as these products are better at dissolving the salt crystals and these solutions leave a barrier behind to reduce future build up.
Spray Yamashield Rust & Corrosion Protectant
In addition to flushing your engine, remove the cowling cover, and liberally spray Yamashield or another marine corrosion prevention product like CRC. Basically, coat anything and everything, certainly including any connection points. You’ll want to do this about every month if you boat in saltwater, every couple of months if you boat in fresh water, and at the end of the season when you are preparing your boat for storage.
Tip 10 – Your Yamaha Outboard Won’t Start
Yamaha outboards requires the following elements to run correctly:
- Properly timed ignition
- The right ratio of fuel/air
- Compression
- Exhaust
So, if your engine won’t start, turn to the following steps.
Start with Lights & Gauges
When you turn your key to start the engine but the engine won’t turn over, turn the key to the “on” position. Are your lights and gauges operating? If they are not working, if you have a battery switch, make sure that it is in the “on” or “both” position.
If it appears as if your battery may be to blame, test it with a voltage multimeter. For most outboards, you need a minimum of 12 volts to start the engine.
Battery Cables
If the battery appears good, look at the cables running from your battery to the boat’s engine. The connections might have gotten jarred loose or become corroded.
Check the Gear Shift Position
If the other accessories are working, but the engine won’t start, check your gear shift. It must be in the neutral position.
Emergency Kill Switch
Is the kill switch in place? If not, the engine likely will not start.
Check Fuses
If you have a bad fuse, most of the time, it’s a simple 20-amp fuse that isn’t difficult to replace.
Inspect Main Power Plug
If the fuse seems good, check the boat’s main power plug connecting the engine wiring to the vessel.
Look at the Primer Bulb
There must be enough fuel getting to the engine. If you pump the primer bulb, it should become firm after a few squeezes. If the primer bulb doesn’t become firm, you might have a leak somewhere in the line, filter, tank, or engine. It could also be due to a bad valve located inside the bulb itself.
Inspect Filters
Pull out the filters and look for sediment blockage and see if water is collecting.
Scan Fuel Line Couplings
Make sure the fuel line couplings are properly locked and seated. Also, check the O-rings as one damaged O-ring might introduce air to the fuel and prevent the engine from starting.
Check Spark Plugs
If you are still not getting to the root of the problem, are your spark plugs extremely fouled or damaged somehow?
Check the Exhaust Outlet
Look for blockage in the exhaust outlet because when the engine can’t exhaust burnt fuel and air, the engine will no longer start. Rodent, bird, or insect nests might actually be the source of the blockage.
Engine Compression
If all else fails and the engine still will not start, you probably need to check the engine’s compression. For many boaters, the engine compression check for Yamaha outboards will likely need to be performed by a certified Yamaha technician.
Tip 11 – Locked Steering on Yamaha Outboards
If your steering system is hydraulic and the steering wheel won’t turn, or the motor won’t react to the wheel, it’s likely low on hydraulic steering fluid. Check for a leak. If you identify a leak and are not in a position to repair it correctly or get to the mechanic’s, you can fix it in the short term with duct tape. Duct tape as a fix-all is a bit of a cliché, but it works.
We hope these tips help, and while you may not be a Yamaha technician, your mechanic friends will be at least a little impressed. Shop PartsVu for your boat parts and maintenance products. Care and maintenance of Yamaha outboards are critical – if properly maintained, they will last for many, many years.